The Privacy and Electronic Communications Regulations (PECR), otherwise known as the cookie law, is a set of regulations that sits alongside the Data Protection Act and the General Data Protection Regulations (GDPR). It provides specific rules on cookies and similar technologies that track user information. PECR has implications for us all, as it means websites have cookie banners.
Cookie banners are often resented by the public, but this is because they are frequently implemented poorly, either by ignorance or by design. In this article we will provide a simple guide to providing your users with a friendly cookie banner that allows them to opt-in to cookies.
Cookie policies
Before we talk about cookie banners, let’s talk briefly about cookie policies. Every website needs a cookie policy if any cookies are used. This policy informs the user what cookies are, how a company is using them, and what controls a user has.
An example of a cookie policy which follows the guidance we give in this article can be found on the Active Lives website for Sport England .
Websites must inform users of the list of cookies which will be used by the site. You should provide the name, the purpose and when they will expire. The most common cookies used in our projects are:
- Cookie banner preferences
- Authentication – enabling a user to log into the website
- Analytics – enabling our customers to see how many visitors they have and how they use the website
- Azure load balancing – ensuring that the same server will serve all requests for a user during their session
The load balancing is the one that can catch people out, because the cookie is added by the hosting environment and not by the developer’s code. It is always worth checking in the browser to see what cookies you’re using.
We are blessed that we don’t need to use marketing or advertising cookies in our projects. These are the most common form of cookies, and are the type of cookie most likely to be resented by the public.

Cookie banners
A common misconception is that you always need a cookie banner. This is not true. User consent is only required for non-essential cookies. If all your cookies are essential, then you don’t need a cookie banner. Cookie banners that say, “this site uses cookies” and has one button that says “accept” serve no purpose. It is therefore important to understand the difference between essential and non-essential cookies.
Essential cookies are required for a site to function. A classic example would be user authentication cookies. Without these cookies the site could not function, so they are permitted without consent. Often people point out that a cookie banner needs a cookie to store the user selection and think that they’ve spotted a paradox – “there is no way to store the user’s cookie preference without cookies”. However, the cookie banner selection is an essential cookie, it doesn’t need the user to opt-in to exist. There is no paradox.
Non-essential cookies is the designation given to everything else. If your site can function without the cookie, then it is a non-essential cookie, and the user must give consent before you deliver the cookie. The most common example in our projects would be user analytics – either Google Analytics or Azure Application Insights.
The 3 cookie rules which are the most important and the most frequently broken by companies are:
1. User consent must be given before the user is given the cookies
2. The option to give consent must not be preselected
3. User must have the ability to update their choice of consent and remove their consent
OCC, along with our custom software solutions team use the Cookie Control cookie banner. This is the same banner used by the Information Commissioner’s Office. We found the hardest bit was making sure that our analytics cookies would only be delivered after consent was given.
Andrew Wilson, a software engineer at OCC has written the below guide on how to implement this functionality.
Implementing Cookie Control with Google Analytics and Azure Application Insights
In this section we’re going to show you how to:
1. Setup a Cookie Control Cookie banner for a site
2. Enable and add Google Analytics 4 (or Universal Analytics) and Application Insights tracking cookies to our cookie banner.
3. Learn how to disable these tracking cookies prior to user opt-in so that we comply with cookie law.
These instructions were correct in May 2022, be sure to check the Cookie Control Documentation for the latest updates.
To begin, head over to the Cookie Control Downloads page and choose which Cookie Control product is right for your project. We’ll be using the Pro Edition in this guide as it will allow us to use custom branding options and have the banner running on subdomains.
In the HTML for your website, insert the following into your <head> tag and add your relevant apiKey and product values from Cookie Control.
<!-- Latest Version -->
<script src="https://cc.cdn.civiccomputing.com/9/cookieControl-9.x.min.js" type="text/javascript"></script>
<script>
var config = {
 apiKey: 'YOUR_API_KEY_HERE',
 product: 'PRO'
};
CookieControl.load(config);
</script>
The above snippet grabs the cookie control JS module, creates a config object, and then initializes the banner. Reload your project, and you should see something like:
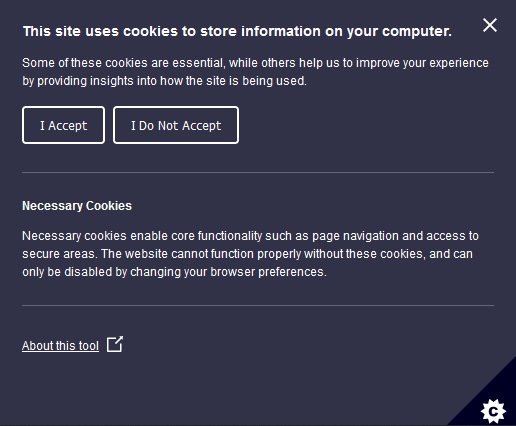
If you’ve selected the PRO edition, you can view the documentation to see how to add your own branding and styling options to your banner. Note that we currently only have a necessary cookies section, next we’ll add our optional Google Analytics and Application Insights cookies.
We’ll start by adding Google Analytics. If you don’t already have either a Google Analytics 4 property or a Universal Analytics property, you can create one here. A property is just a bucket for the google analytics reports and data for your website or app. Once you’ve created your property, find it’s MEASUREMENT_ID by viewing it from your Analytics account and add the following global snippet immediately after the opening <head> tag with your ID inserted:
<!-- Global site tag (gtag.js) - Google Analytics -->
<script async src="https://www.googletagmanager.com/gtag/js?id=MEASUREMENT_ID"></script>
<script>
    // Disable until user opt-in. Works w/ Universal Analytics and Google Analytics 4.
    window['ga-disable-MEASUREMENT_ID'] = true;
    // Initialize google tag manager.
    window.dataLayer = window.dataLayer || [];
    function gtag(){dataLayer.push(arguments);}
</script>
Two things are happening here: we’re loading google tag manager, which will handle the collection and processing of the data associated with our property, and we’re disabling tracking immediately because we want to comply with PECR and not track until our users have opted in. But how do they opt-in?
The Cookie Control config option for us to pay attention to is the optionalCookies field which contains a list of the different cookies the website might set, and offers users controls for opting in or out. The Google Analytics option should look like:
var config = {
    // Previous fields..
    optionalCookies: [{
        name: 'analytics',
        label: 'Google Analytics',
        description: ”We’d like to use google analytics in order to...”,
        // The cookies associated with this option.
        cookies: ['_ga', '_gid', '_gat'],
        onAccept: function () {
            // Enable tracking.
            window['ga-disable-MEASUREMENT_ID'] = false;
            // Begin tracking.
            gtag('js', new Date());
            gtag('config', 'MEASUREMENT_ID');
        },
        onRevoke: function () {
            window['ga-disable-MEASUREMENT_ID'] = true;
        }
    },
Most of the options are self-explanatory. The ones of interest are the onAccept and onRevoke fields which are functions that are run when the user toggles the option on or off. In particular, onAccept first enables and then begins tracking whereas onRevoke simply disables tracking. And that’s it for Google Analytics! On to Application Insights.
As before, if you haven’t already created an Application Insights Resource, you can create one by following the instructions here. There are a couple of ways to add Application Insights to your website, here we use the snippet based setup as it allows for greater flexibility. Like Google Analytics, copy the script snippet located in the previous link and paste it at the beginning of your <head> tag making sure to insert your AI connection string (or instrumentation key depending on how you created your resource) in the cfg object at the end of the snippet. Next, modify your cfg object to look like:
cfg: { // Application Insights Configuration
        connectionString: "APPLICATION_INSIGHTS_CONNECTION_STRING",
        /* Make sure cookies are disabled prior to the user opting in. */
        isCookieUseDisabled: true,
        /* ...Other Configuration Options... */
Load and disable, same as Google Analytics. The only thing left to do is add Application Insights as another optional cookie to our banner. This means adding an extra object to our optionalCookies field in the config object and it will look like:
<script>
    var config = {
        // Previous fields..
        optionalCookies: [
            // Google Analytics config object from earlier...
            {
                name: 'ai',
                label: 'Application Insights',
                description: "We'd like to use AI in order to...",
                // The cookies associated with this option.
                cookies: ['ai_user', 'ai_session'],
                onAccept: function() {
                    // Enable cookies.
                    window.appInsights.config.isCookieUseDisabled = false;
                },
                onRevoke: function() {
                    // Disable cookies.
                    window.appInsights.config.isCookieUseDisabled = true;
                }
            }
        ]
    }
</script>
As before, most of the options speak for themselves with the onAccept and onRevoke functions respectively enabling and disabling cookies as indicated.
The functionality required is now embedded in our banner. With some additional branding configuration to change the buttons (only available in the PRO edition) we arrive at:
Avoiding cookie banners
In this article we’ve looked at how to implement one. However, to conclude, I want to ask the question: can we avoid requiring a cookie banner in the first place? Cookie banners are an obstruction that slow your users down when they’re trying to access your content. If we could avoid the banners entirely, we would provide a much better experience for the user. I believe this is possible, but the trade-off is not tracking users.
I’m lucky that I work on projects where we don’t rely on advertisements on our websites. Instead, we’re only asked to add user analytics. These analytics are most often used to answer 1 simple question: are people using our service? We answer this question by providing the number of unique visitors they’ve had over the last 30 days. To define a unique visitor, we need a tracking cookie, so we can recognise returning users. However, if we instead ask the question: how many people have requested the page / logged in / run the calculation, then we can collect this data anonymously; we don’t need cookies, we can count function calls in the server code. Admittedly, we lose the ability to know which requests were from the same user, but we can use knowledge of our product to estimate how many requests each user makes. If we do this, we can track how popular our site is, without tracking users, and without requiring a cookie banner.
In short, the best way to be compliant with PECR is to not track users. However, if you can’t avoid it, hopefully this guide will help you to implement your consent driven cookie banner.